每拥有一台新的 Linux 服务器,配置 VSCode Remote SSH 是我一定要做的设置之一。
而这次,我又碰壁了。。。…( _ _)ノ|
问题定位
通过开发人员工具(✘)
旧版的插件(或许是 VSCode 本体)远程连接过程中,会在终端打印连接日志,而现在不会默认显示终端,尝试多次连接失败,姑且先打开 “开发人员工具” 看看。

嗯,果然有一条 WebSocket close with status code 1006。
查一下吧,然而不论国内外,答案都是清一色的……
delete the folder
~/.vscode-server
这个办法我早就试过了,并不能解决,看来这并不是问题的根本。
通过插件日志(✔)
前面有说到新版的不知道是 VSCode 还是 插件的原因,现在远程连接过程中不会自动弹出控制台并显示连接日志,即使是手动打开了输出 tab 也是空白一片。
直到偶然间想起来不知何时为何忽略掉的一个 UI。。。
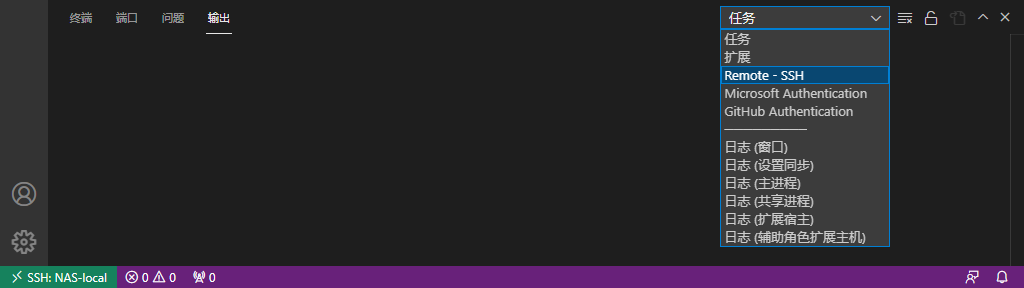
切换过去
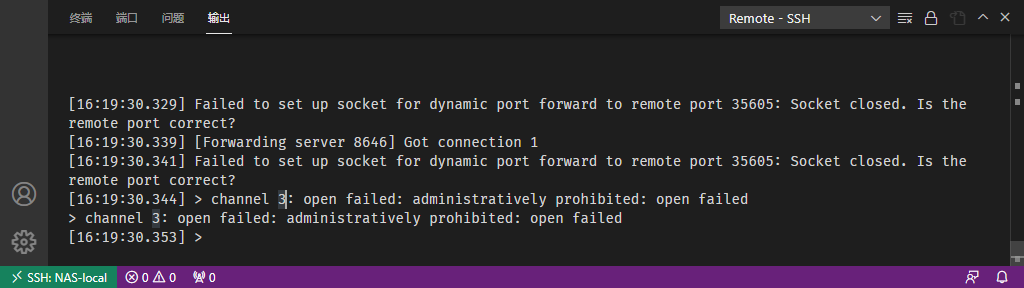
这下就比之前清楚很多了:
Failed to set up socket for dynamic port forward to remote port 35605
administratively prohibited: open failed
虽然不知道第二个该怎么理解,姑且认为它就是报错了,而第一条可以推测出和端口转发有关,那么就这两句再次进行一个 Google 的查。
找到以下两条来自 github 大佬的提示
https://github.com/microsoft/vscode-remote-release/issues/744#issuecomment-504248535
By the way, I’ve set AllowTcpForwarding as yes, and I’ve set MaxSessions as 50.
https://github.com/microsoft/vscode-remote-release/issues/4039#issuecomment-731859011
It sounds like you found the right section of the docs, but there is nothing else we can do, if tcp port forwarding is not working on the server then this will not work.
以及 Remote - SSH 官方文档的说明
Enable TCP Forwarding on the remote host
Remote - SSH extension makes use of an SSH tunnel to facilitate communication with the host. In some cases, this may be disabled on your SSH server. To see if this is the problem, open the Remote - SSH category in the output window and check for the following message:
open failed: administratively prohibited: open failedIf you do see that message, follow these steps to update your SSH server’s sshd config:
- Open
/etc/ssh/sshd_configorC:\ProgramData\ssh\sshd_configin a text editor (like Vim, nano, Pico, or Notepad) on the SSH host (not locally).- Add the setting
AllowTcpForwarding yes.- Restart the SSH server. (On Ubuntu, run
sudo systemctl restart sshd. On Windows, in an admin PowerShell run,Restart-Service sshd).- Retry.
对策
问题明确了,就该对症下药了。
其实上面 Remote - SSH 的官方文档已经给出答案了:将服务器的 ssh 服务配置中 AllowTcpForwarding 一项设置为 yes。
以我的 OpenMediaVault 为例(omv 的 sshd_config 没有注释,排序也和手动安装的 OpenSSH 不一样,不过配置项确实和 OpenSSH 一样,并不影响)
用喜欢的编辑方式打开
/etc/ssh/sshd_config1 2 3 4 5 6 7 8 9 10 11 12 13 14 15 16 17 18 19 20 21 22 23 24 25 26 27 28 29 30Protocol 2 HostKey /etc/ssh/ssh_host_rsa_key HostKey /etc/ssh/ssh_host_dsa_key HostKey /etc/ssh/ssh_host_ecdsa_key HostKey /etc/ssh/ssh_host_ed25519_key SyslogFacility AUTH LogLevel INFO LoginGraceTime 120 StrictModes yes IgnoreRhosts yes HostbasedAuthentication no PermitEmptyPasswords no ChallengeResponseAuthentication no X11Forwarding yes X11DisplayOffset 10 PrintMotd no PrintLastLog yes TCPKeepAlive yes AcceptEnv LANG LC_* Subsystem sftp /usr/lib/openssh/sftp-server UsePAM yes AllowGroups root ssh AddressFamily any Port 22 PermitRootLogin yes AllowTcpForwarding no Compression no PasswordAuthentication yes AuthorizedKeysFile .ssh/authorized_keys .ssh/authorized_keys2 /var/lib/openmediavault/ssh/authorized_keys/%u PubkeyAuthentication yes找到
AllowTcpForwarding修改为yes23 24 25 26 27 28 29 30...(略) Port 22 PermitRootLogin yes AllowTcpForwarding yes Compression no PasswordAuthentication yes AuthorizedKeysFile .ssh/authorized_keys .ssh/authorized_keys2 /var/lib/openmediavault/ssh/authorized_keys/%u PubkeyAuthentication yes或者直接在文件最后追加
AllowTcpForwarding yes23 24 25 26 27 28 29 30 31...(略) Port 22 PermitRootLogin yes AllowTcpForwarding no Compression no PasswordAuthentication yes AuthorizedKeysFile .ssh/authorized_keys .ssh/authorized_keys2 /var/lib/openmediavault/ssh/authorized_keys/%u PubkeyAuthentication yes AllowTcpForwarding yes重启 ssh 服务
1sudo systemctl restart sshd.service再次尝试 Remote,此时没有意外的话就可以成功访问
总结
さすがぼくなのだ!