
之前的博客源码还没来得及 push 就因为电脑硬盘损坏而夭折,不过近期重建了,
仍使用 Hugo,
在此主要记录下博客的搭建过程中 Hugo 的相关操作。
Note: 标注 [*] 的为非必要环节,可略过
安装 Hugo
从 GitHub 下载安装
说是安装,实际上官方发布的 Hugo 是绿色软件,
只需要从 GitHub 发布页面
根据自己的OS下载对应版本的压缩包,然后可执行文件解压至任目录下,
随后将该目录
追加到环境变量
PATH 中即可。
通过 Chocolatey 安装
如果你使用的操作系统是 Windows 碰巧又安装了 Chocolatey,
那么使用以下命令安装会更方便,以至于无需手动配置环境变量。
或者安装 extended 版本
1
| choco install hugo-extended -y
|
Note: 本站使用的主题是 nicesima,需要安装 extended 版本以支持 SASS
*验证安装
任意目录下启动命令行工具并执行以下命令
如果有类似下面的打印输出,就说明安装成功(根据安装的 Hugo 版本,打印的内容会有些许不同)

初始化
创建 Hugo 站点的第一步,是使用 Hugo 初始化一个新项目。
选个自己喜欢的目录,启动命令行工具,cd 切换进去,接着执行
上述命令会在当前目录下创建一个 blog 文件夹,你博客的所有源码都将存放在这个目录下。
通常,这个文件夹的初始目录结构应该和下面是一样的
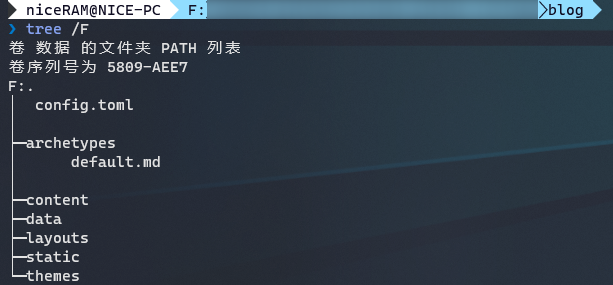
下面简单说下这些目录/文件是干什么的:
- archetypes/: 原型模板目录
- default.md: 默认原型。下面的 定义默认原型 中再讲解
- content/: 网站内容目录
- data/: 数据模板目录
- 用于存放
.yaml,.json或.toml文件用于某些高级操作,
因为我还不熟,这次我们不用它
- layouts/: 布局模板目录
- 用于存放
.html文件,Markdown 会渲染成什么样的静态网站,
几乎就是靠布局模板决定的。当然,通常这里并不需要自己操刀,空着就行,
完全可以将共通样式交给下面的 主题 来完成
- static/: 静态文件目录
- 该目录下的文件在 build 时将被拷贝到网站的根目录,通常用于存放网站图标
favicon.ico, js, css 等文件
- themes/: 主题目录
- 将下载的主题存放于此,Hugo 将根据指定的主题渲染网站
- config.toml: 网站的配置文件
安装主题
从 Hugo Themes 选一个自己喜欢的主题下载,
有些定制主题没有上架,你也可以在 GitHub 搜索,或者善用搜索引擎(
hugo theme
)。
以本站主题为例,在 blog 目录执行以下命令安装主题
1
| git clone https://github.com/niceRAM/nicesima.git themes/nicesima
|
Note: 如果你对 git 的使用相对熟练,这里更推荐你将主题添加为 submodule。
网站配置
Hugo 支持三种配置格式:yaml, toml, json,默认为 yaml。
也就是你的网站配置可以是 config.yaml, config.toml 或者 config.json,
只不过 Hugo 默认只为你生成 toml 格式的配置文件。
如果需要改用其他格式,你需要将现有的配置内容修改成相应的格式并重命名配置文件。
通过初始化生成的默认配置文件 config.toml 中只有短短几行配置。
1
2
3
| baseURL = "http://example.org/"
languageCode = "en-us"
title = "My New Hugo Site"
|
根据主题的不同,配置文件也有可能不同,很难细说。
下面仅基于本站主题整理成模板以供参考。
Note: 标有[主题依赖]的配置是否有效取决于主题是否实现该功能(有可能标注不完整,仅供参考)
 1
 2
 3
 4
 5
 6
 7
 8
 9
10
11
12
13
14
15
16
17
18
19
20
21
22
23
24
25
26
27
28
29
30
31
32
33
34
35
36
37
38
39
40
41
42
43
44
45
46
47
48
49
50
51
52
53
54
55
56
57
58
59
60
61
62
63
64
65
66
67
68
69
70
71
72
73
74
75
76
77
78
79
80
81
82
83
84
85
86
87
88
89
90
91
92
93
94
95
96
97
98
99
| baseURL = "https://niceram.xyz/" # 博客网址
languageCode = "zh-CN" # 网站语言。国际化需要
title = "NiceBlog" # 博客的名字。浏览器 title 上也会显示
hasCJKLanguage = true # 统计汉字
theme = "nicesima" # 主题
paginate = 11 # 每页的文章数
enableEmoji = true # 支持 Emoji
enableRobotsTXT = true # 支持 robots.txt
googleAnalytics = "" # Google 统计 id
# Chroma 代码高亮 http://gohugo.io/content-management/syntax-highlighting/
pygmentsUseClasses = true # 使用自定义的代码高亮样式
[markup]
[markup.highlight]
codeFences = true
anchorLineNos = false
guessSyntax = false
hl_Lines = ""
lineAnchors = ""
lineNoStart = 1
lineNos = true
lineNumbersInTable = false
noClasses = true
style = "monokai"
tabWidth = 4
[Permalinks]
posts = "/:year/:month/:day/:filename"
[menu]
[[menu.main]]
name = "Blog"
url = "/posts/"
weight = 1
[[menu.main]]
name = "Categories"
url = "/categories/"
weight = 2
[[menu.main]]
name = "Tags"
url = "/tags/"
weight = 3
[[menu.main]]
name = "About"
url = "/about/"
weight = 4
[params]
since = "2018" # 站点建立时间。也是版权的开始年份
author = "niceRAM" # 作者名字
avatar = "" # 头像
subtitle = ""
description = ""
license = '本文采用<a rel="license" href="http://creativecommons.org/licenses/by-nc/4.0/" target="_blank">知识共享署名-非商业性使用 4.0 国际许可协议</a>进行许可'
enableGitalk = false # [主题依赖]gitalk 评论系统全局开关
enableUtteranc = true # [主题依赖]Utteranc 评论系统全局开关
showPostSocialLinks = true # [主题依赖]开启每一篇文章的 social-links 显示 (与主页显示与否无关)
easySearchedEngine = "google" # [主题依赖]Easy-Searched-Text 默认使用的搜索引擎
toc = true # [主题依赖]是否开启目录
autoCollapseToc = false # [主题依赖]Auto expand and collapse toc
mathjax = true # [主题依赖]是否使用mathjax(数学公式)
[params.gitalk] # [主题依赖]Github: https://github.com/gitalk/gitalk
clientId = "" # Your client ID
clientSecret = "" # Your client secret
repo = "" # The repo to store comments
owner = "" # Your GitHub ID
admin = "" # Required. Github repository owner and collaborators. (Users who having write access to this repository)
id = "location.pathname" # The unique id of the page.
labels = "gitalk" # Github issue labels. If you used to use Gitment, you can change it
perPage = 15 # Pagination size, with maximum 100.
pagerDirection = "last" # Comment sorting direction, available values are 'last' and 'first'.
createIssueManually = true # If it is 'false', it is auto to make a Github issue when the administrators login.
distractionFreeMode = true # Enable hot key (cmd|ctrl + enter) submit comment.
proxy = "" # Set a proxy by 'cors-anywhere', 'cors-proxy' or the thoers.
[params.utteranc] # [主题依赖]Homepage: https://utteranc.es
repo = "" # The repo to store comments
issueTerm = "" # the mapping between blog posts and GitHub issues.
theme = "" # Theme
crossorigin = "" # default: anonymous
[params.social] # [主题依赖]
Bilibili = "uid"
Github = "github_id"
Linked = "id"
Twitter = "id"
Instagram = "id"
Email = "email"
Facebook = "id"
Telegram = "id"
Dribbble = "id"
Medium = "id"
Wechat = "wechat_qrcode_image.png"
|
*原型模板
Note: 这一步不是必须的,因为生成的每一篇文章都可以单独配置下面提到的 front matter。这里只是简单介绍,可以根据自己的需求修改,以减少重复工作、提升效率。
默认模板
还记得前面说过的 archetypes 原型模板目录吧,这个目录下默认会创建一个 default.md,
在 新建文章 的时候会将其作为原型自动为新的 Markdown 添加
front matter。
在未更改 default.md 的情况下,新建的 Markdown 中仅会自动添加以下内容
1
2
3
4
5
| ---
title: "{{ replace .Name "-" " " | title }}"
date: {{ .Date }}
draft: false
---
|
- title: 文章标题。默认是从文件名替换而来
- date: 文章的创建日期。
- draft: 草稿标记。当设置为
true 时,Hugo 默认不会生成该文章的预览和 HTML。
以本文举个例子,运行 hugo new posts/Hugo-静态博客搭建.md 后生成的 Markdown 内容将是
1
2
3
4
5
| ---
title: "Hugo 静态博客搭建"
date: 2021-03-04T11:25:03+08:00
draft: false
---
|
上面两行 --- 及其中间键值对形式的配置就是 front matter 了。
配置格式
Hugo 支持的配置格式同样适用于 front matter,这里我们默认使用 yaml的格式。
当然你也可以修改成自己习惯的格式:
toml:将两行 --- 替换为 +++,并将中间的配置信息修改为 toml 格式。json:将两行 --- 分别替换为 { 和 },并将中间的配置信息修改为 json 格式。
修改示例
既然我们已经知道 front matter 是做什么的了,下面该按照自己的xp品味正式修改它了。
一般,我们的博客一定会有两个页面: tags 和 categories。
将文章标记到某个或某些 tags 和 categories 中,只需要在 front matter 中配置就好。
以本文为例,
下面是三种格式分别修改后的 default.md 以级对应生成的 Markdown 中写法的示例。
YAML
default.md
1
2
3
4
5
6
7
| ---
title: "{{ replace .Name "-" " " | title }}"
date: {{ .Date }}
draft: false
tags:
categories:
---
|
Hugo-静态博客搭建.md
 1
 2
 3
 4
 5
 6
 7
 8
 9
10
11
| ---
title: "Hugo 静态博客搭建"
date: 2021-03-04T11:25:03+08:00
draft: false
tags:
- "Hugo"
- "静态博客"
- "教程"
categories:
- "关于我想玩博客却不一定会玩博客还有可能把博客玩坏这件事"
---
|
TOML
default.md
 1
 2
 3
 4
 5
 6
 7
 8
 9
10
11
| +++
title= "{{ replace .Name "-" " " | title }}"
date= {{ .Date }}
draft= false
tags= [
]
categories= [
]
+++
|
Hugo-静态博客搭建.md
 1
 2
 3
 4
 5
 6
 7
 8
 9
10
11
12
13
| +++
title= "Hugo 静态博客搭建"
date= "2021-03-04T11:25:03+08:00"
draft= false
tags= [
"Hugo",
"静态博客",
"教程"
]
categories= [
"关于我想玩博客却不一定会玩博客还有可能把博客玩坏这件事"
]
+++
|
JSON
default.md
 1
 2
 3
 4
 5
 6
 7
 8
 9
10
11
| {
"title": "{{ replace .Name "-" " " | title }}",
"date": "{{ .Date }}",
"draft": false,
"tags": [
],
"categories": [
]
}
|
Hugo-静态博客搭建.md
 1
 2
 3
 4
 5
 6
 7
 8
 9
10
11
12
13
| {
"title": "Hugo 静态博客搭建",
"date": "2021-03-04T11:25:03+08:00",
"draft": false,
"tags": [
"Hugo",
"静态博客",
"教程"
],
"categories": [
"关于我想玩博客却不一定会玩博客还有可能把博客玩坏这件事"
]
}
|
几句废话
此时你可能已经注意到了,这里 tags 和 categories 的写法和之前有些不同了。
因为这两个配置是
数组
,所以以列举的形式出现了。
另外,机灵的你也许还发现了 default.md 中的 title 出现了双引号内部嵌套双引号的现象,
于是这里的代码高亮提示了语法错误。
但是这里实际上不会报错,因为内部的双引号是在 Hugo 的表达式中,也就是 {{ 和 }} 之间的。
在生成 Markdown 时表达式将优先处理,所以最后只会剩下外层的两个双引号。
Note: 实在有强迫症的话也许可以把内层或外层的引号换成单引号
再另外,更机灵的你也许还意识到:这里配置的内容有点类似作用于每一篇文章内的局部变量,
那么就可以更灵活地利用以实现某些更高级的特性,例如单独开关某篇文章的评论系统等。
因为并不是必须的,这里就不再赘述了。
新建文章
执行以下命令,新建一篇文章
1
| hugo new /posts/my-first-post.md
|
上述命令将在 content/posts/ 目录下新建一个 my-first-post.md 文件,
生成的 front matter 由你的原型模板决定。
网站预览
完成网站配置,也就是 conig.toml 的设置后,执行以下命令
上述命令将启动一个临时的 Hugo 服务器,打开浏览器访问 http://localhost:1313 即可看到你的博客了。
又是亿点点废话
这里稍微展开一下,Hugo 既然也算是个
CLI
,那么应该也有命令帮助。
我们试一下
予想通り、命令帮助被输出在画面上了嘛,虽然我本来就知道了
 1
 2
 3
 4
 5
 6
 7
 8
 9
10
11
12
13
14
15
16
17
18
19
20
21
22
23
24
25
26
27
28
29
30
31
32
33
34
35
36
37
38
39
40
41
42
43
44
45
46
47
48
49
50
51
52
53
54
55
56
57
58
59
60
61
62
63
64
65
66
67
68
69
70
71
| hugo is the main command, used to build your Hugo site.
Hugo is a Fast and Flexible Static Site Generator
built with love by spf13 and friends in Go.
Complete documentation is available at http://gohugo.io/.
Usage:
hugo [flags]
hugo [command]
Available Commands:
config Print the site configuration
convert Convert your content to different formats
deploy Deploy your site to a Cloud provider.
env Print Hugo version and environment info
gen A collection of several useful generators.
help Help about any command
import Import your site from others.
list Listing out various types of content
mod Various Hugo Modules helpers.
new Create new content for your site
server A high performance webserver
version Print the version number of Hugo
Flags:
-b, --baseURL string hostname (and path) to the root, e.g. http://spf13.com/
-D, --buildDrafts include content marked as draft
-E, --buildExpired include expired content
-F, --buildFuture include content with publishdate in the future
--cacheDir string filesystem path to cache directory. Defaults: $TMPDIR/hugo_cache/
--cleanDestinationDir remove files from destination not found in static directories
--config string config file (default is path/config.yaml|json|toml)
--configDir string config dir (default "config")
-c, --contentDir string filesystem path to content directory
--debug debug output
-d, --destination string filesystem path to write files to
--disableKinds strings disable different kind of pages (home, RSS etc.)
--enableGitInfo add Git revision, date and author info to the pages
-e, --environment string build environment
--forceSyncStatic copy all files when static is changed.
--gc enable to run some cleanup tasks (remove unused cache files) after the build
-h, --help help for hugo
--i18n-warnings print missing translations
--ignoreCache ignores the cache directory
--ignoreVendor ignores any _vendor directory
--ignoreVendorPaths string ignores any _vendor for module paths matching the given Glob pattern
-l, --layoutDir string filesystem path to layout directory
--log enable Logging
--logFile string log File path (if set, logging enabled automatically)
--minify minify any supported output format (HTML, XML etc.)
--noChmod don't sync permission mode of files
--noTimes don't sync modification time of files
--path-warnings print warnings on duplicate target paths etc.
--print-mem print memory usage to screen at intervals
--quiet build in quiet mode
--renderToMemory render to memory (only useful for benchmark testing)
-s, --source string filesystem path to read files relative from
--templateMetrics display metrics about template executions
--templateMetricsHints calculate some improvement hints when combined with --templateMetrics
-t, --theme strings themes to use (located in /themes/THEMENAME/)
--themesDir string filesystem path to themes directory
--trace file write trace to file (not useful in general)
-v, --verbose verbose output
--verboseLog verbose logging
-w, --watch watch filesystem for changes and recreate as needed
Additional help topics:
hugo check Contains some verification checks
Use "hugo [command] --help" for more information about a command.
|
从事过前端开发的朋友可能已经猜到了些什么,既然我们需要预览,那怎么能少得了“自动重载”和“test环境”呢。
大致找了找,Hugo 还真有那么几个 flag 的功能有点类似。
1
| -D, --buildDrafts include content marked as draft
|
前面 “原型模板” 一章提到的 draft 就通过这个 flag 体现出效果了。
如果启动 Hugo 预览时没有追加 -D 或者 --buildDrafts,
Hugo 将不会为 front matter 中设置了 draft: true 的文章生成预览。
1
| -w, --watch watch filesystem for changes and recreate as needed
|
相比上一个,这个就更好用了。
启动 Hugo 预览时追加 -w 或者 --watch,Hugo 服务器在运行中会实时监测你博客目录下的所有文件。
一旦有文件发生变更,Hugo 便会及时将这些变更反映到当前运行的 Hugo 服务器中。
(白话文:加了这个 flag,修改文件你只管写文章、保存、预览,一气呵成,不用手动重启 Hugo 就能做到)
综上,以后运行博客预览只需执行以下命令即可
Note: 其他子命令和 flag 像 config、--minify 等,好玩的挺多的,只不过这些不是本文的重点,就不再过多讲解。
生成静态网站
预览都 OK 了,就可以正式生成静态网站了,也就是各种 .html、.css、.js 之类的。
执行以下命令
你的博客根目录 blog 下将会生成一个 public 目录,这里面就是你博客真正要发布的静态网站,
之后就是 Nginx, Apache, Caddy 等静态网站中间件的工作了。
Note: 本站是使用 GitHub Pages 运行的,有机会的话,在以后的文章中再介绍